Wednesday, September 12, 2012

Battlefield 3

Guns. Explanation for the contents. Now with Back to Karkand.
Be sure to check the Message Board for information others have gathered from the data already.
Check out the data yourself with Frankelstner's extraction script.

WEAPON
The gun's there, obviously. Little symbol and word to show what class the weapon belongs to.
An indicator as to which fire modes the weapon has, Auto, Burst, single.

DAMAGE
Two damage numbers and the drop off points indicated by the red lines.
It is important to note here that the kind of ammo a weapon uses is taken into account.
The bullet itself determines the damage and range, the weapon just shoots them, which is why most weapons have the same damage.
Bullets have varying SPEED and DROP values.
For damage multipliers, all weapons deliver:
2.0x to the Head
1.0x to the Body
0.9x to the Legs

AMMO
CAPACITY is pretty straightforward. The magazine plus one in the chamber if it works that way.
The RATE OF FIRE in rounds per minute.
Bolt action rifles and the 870MCS show the time to rechamber the weapon.
The AN-94 is unique in that its BURST RATE OF FIRE differs from it's fully automatic rate of fire.

RELOAD time when the weapon is partially full.
RELOAD EMPTY time when the weapon has been... emptied.
1stRELOAD for shotguns that reload one at a time.
NEXT REL. for all shotguns rounds after the first.
SPREAD
Weapons have an inherit inaccuracy when sighted.
For example the AK-74M has a 0.2 cone of fire when zoomed and standing still.

BASE Spread when standing still.
ZOOM Spread when sighted and still.
ZOOM MOVE Spread when sighted and moving.
Spread added PER SHOT, and the Spread RECOVERY per second.
NOTE: The behavior of Spread is more like Battlefield 2 than Bad Company 2.
The very low increase per shot and the high decrease per second may seem odd, but that is because the weapon does not gradually recover while you are firing, only after you have released the trigger.
The patch released alongside Back to Karkand has doubled the increase per shot for nearly every weapon, making them unreliably inaccurate far more quickly.

SHOTGUNS have an inherit spread for Buckshot and Flechette.
The 870MCS only has a 2.0 cone of fire while the automatics have 4.0.
SLUG, SLUGZ and ZMOVE for their spread when using Slug or Frag rounds.

RECOIL
A fixed upwards number.
Two left-right numbers which make the area the weapon will randomly kick in.
A rapid recovery rate per second.

The FIRST SHOT taken with a weapon at rest has its recoil multiplied.
In nearly every weapon, the recoil is higher.
The AN-94 is unique in that its first shot recoils less, making its two round burst especially effective.
SHOTGUNS
Take note that the damage column along the shotguns are for the types of shot and not just to that particular shotgun.
Buckshot, Flechette, Frag, Slug for automatics and Slug for the 870MCS.

The FRAG shotgun round not only delivers impact damage, but has a small explosive blast of 40 damage over a 3 meter radius.
A point blank shot is capable of a one hit kill.

Call of Duty 1

It's a blast from the past. Call of Duty 1.

All of the weapon info taken out of the several .pk3 files in Call of Duty\Main.
There are duplicates of weapon files, due to weapon changes with patches.
For example, several weapons had their Reload Add Time altered... But few weapons benefit from Add Time compared to those in COD4.

The method of balance between weapons is... unusual in COD1.
In fact, there isn't a balance; the Thompson outclasses most other automatic weapons and the PPSh utterly crushes them.
The german weapons are all weaker than the allied force they're up against.
The only weapons that are on even ground are the bolt action rifles.

There's also the fact that, due to the non-zeroed sights and bad spread even when aiming, the "skill" in aiming for more vital bodyparts (or aiming at all) does not exist.
With the exception of the Scoped Rifles, aiming for the center of mass and hoping for the best beyond point blank range is all you can do.

There is a single hit location multiplier applied to all weapons.
Weapons only have one maximum spread for all three stances.
The programming for weapons in COD1 is exactly the same for COD4, but COD1 lacks a lot of variables that were added in COD2 and COD4. It is still the same engine.

In the same way that the attachments for COD4 are actually different "weapons" in the game, weapons in COD1 with fire selectors are in fact two seperate "weapons", each with a different fire rate/mode.

There are two weapon rows with asterisks ***; those guns have notable discrepancies.
I'll stick them in after the chart.

And of course, players have 100 points of health.
Note: The numbers on this chart are NOT the same for United Offensive.


Discrepancies.

PPSh
The PPSh's accuracy in both aiming and firing from the hip are different with fire modes.
The spread values for the Automatic PPSh are (smaller is more accurate, dummy!):
hipSpreadStandMin\1.3\hipSpreadDuckedMin\1.35\hipSpreadProneMin\1.2\adsSpread\1.05\
And the spread for the semi-sutomatic PPSh:
hipSpreadStandMin\1.3\hipSpreadDuckedMin\1.2\hipSpreadProneMin\1\adsSpread\1.2\

Going prone with the PPSh in Semi-Auto and firing from the hip is more accurate than aiming down the sights.
And crouching is exactly the same in accuracy. Crouching in full-auto is less accurate from the hip than standing.

BAR
Again, another weapon more accurate from the hip, both firemodes are the same in this.
The PPSh accuracy is a chump compared to this. The BAR, when prone, is literally twice as accurate from the hip than aiming down the sights.
Prone = 0.15, Sights = 0.3

United Offensive changed a bunch of the existing weapons.
For example, the BAR is almost as accurate from the hip STANDING than aiming down the sights in UO, having its ADS Spread increased to 1.
Most of the automatic weapons are far less accurate down the sights than what they used to be in COD1.
Some are completely unreliable, LMGs having accuracy only slightly better than the SMGs.
And this is in a situation where the maps have become significantly larger to accommodate vehicles.
The bolt action rifles were the only accurate weapons in the game and the greater distance makes even them victim to arbitrary misses.
There is no reason to use the regular Sten; the silenced one is identical, but more accurate.

Battlefield: Bad Company 2

Battlefield Bad company 2 Chart.
The numbers listed are taken directly from the game code of the PC version.

-----
The basics of any of the primary weapons are:
-Damage
Damage starts high up close, drops over distance, and continues at a lower damage amount.

-Rate of Fire
"Rate" is measured in Rounds Per Minute.
"Time" is the delay between each shot.

-Reload Time
Reloading is made of Time and Threshold (or "Add").
"Time" is the time in seconds for the weapon to finish the reload animation and be ready to fire.
"Add" is the point in time during the reload when the ammo counter changes.

The Pump Action shotguns reload one round at a time.
The first shell takes longer to reload than all shells after it.
After being loaded, the shotgun will play a "post reload" animation that will ready it for shooting.
For those three shotguns, the chart reads "First", "Next" and "Ready".

The player can cancel the reload by switching weapons (the fastest method).
Doing so after the Add Time or during Ready Time will allow the player to reload and get the weapon ready to fire more quickly.

-Spread, Spray and Recoil
There are MANY variables related to a weapon's accuracy and inaccuracy.
To make it as simple as possible, a bigger number = worse accuracy, more recoil.

There are now a bunch of different things in Spread. Kinda cluttered.
"Base" is the minimum hip spread when standing still.
"Move" is the min hip spread when moving.
"Zmov" is the spread when sighted and moving.
"SLUGZM" is the shotgun slug accuracy when zoomed and moving.
Pistols have "Zoom" - spread other than perfect 0.0 - which is the spread when sighted and standing still. The pistol have the same spread standing still as they do moving.
The two in Spray are spread added to the weapon with each shot from the hip and sighted.
The two in Recoil are the weapon's sights and camera jumping around with each shot when sighted.

"Kick" is the angle increase with each shot.
Higher "Amp" means that the kick becomes sharper and faster, even causing the Angle Increase to be even greater.
Example being the M9 (0.6 and 7.0) and the MP-412 (3.5 and 7.0).
They have the same kick value, but the REX has six times the Amp, and their difference in recoil is clear.

Ammo is self-explanatory.
Bullets in your magazine and the damage multiplier for headshots.

Soldier health is 100.
Ceramic Body Armor is 125.
Six seconds after taking damage, the player will recover three health per second.

In "Hardcore" players have 60 health.


A brief explanation for a few other numbers...
There are variables for each posture and again for each posture when sighted.
A "Min" for when the player is not firing his weapon and a "Max" for the highest spread a weapon can have from firing.

Weapons universally recover 3.0 degrees of spread per second.
LMGs, the G3 and Semi-Auto primary weapons recover 5.0 spread a second when zoomed, resulting in greater accuracy with successive shots.
Spread and recoil are always recovering, even while firing, in between shots.
Nearly all weapons have a 5.0 "Max" spread in any posture. Pistols have a Max of 3.0 (2.0 zoomed) and Sniper rifles have 7.0.
NOTE that the Vietnam M14 has a recovery of 5.0 to the other rifles' 3.0.

From the hip, crouching has little benefit for most weapons except for LMGs in which hip spread barely improves.
Crouching while sighted, most weapon subtracts 0.05 from its Amp.
The Flamethrower projectiles travel along the stream, each one delivering 20 damage on hitting a soldier.
Once hit, the Soldier takes 50 damage over the course of 7 seconds.
So you'll need to at least hit him at least three times with fire to have the burning over time take him out.
The flames fade out after 0.3 seconds, so they only travel out to about 15 meters.

-----

Explosive weapons behave quite differently between themselves.

Blast Damage is a single damage number (bottom number) that continues for a short distance (Red number).
After that, damage linearly drops to zero by it's maximum range (top number).
The red number is its approximate lethal range to infantry at full health when using the Explosive Damage Spec.

Against Armored Vehicles, explosive damage is modified every which way.
Against Tanks and APCs, the listed number is the damage done to their 1250 health.
The explosive icon means the vehicle takes it as explosive damage, the side hit does not matter.
The bullet icon means the vehicle takes it as projectile damage and hitting it in the rear or side will do extra damage based on the Vehicle Chart.
The Anti-Tank mine is sometimes capable of destroying tanks with only one mine, but it is not consistent.
The underside of vehicles seems extra vulnerable to damage.
Against lighter vehicles, most of these explosives will take them out in one hit.

Speed is simple - higher number, faster it goes.
Note that the RPG-7 can speed up a bit if being guided by a Tracer Dart.

Detonation is a mix of things.
The time it takes to throw a grenade after pressing the button and the time it takes to explode.
The 40mm grenade takes 0.2 seconds before it will detonate, hitting something at less than about 10m will make it a dud.
A direct hit with the 40mm will still hit and kill an enemy.
The Tracer Dart lasts for 45 seconds after sticking to something.

Reload is the same as the Weapon Chart with the time it takes to reload and the time the ammo counter changes.
Also included is the time it takes to get one explosive of that type from the Assault's Ammo Box.


-----

Vehicles are very uniform, each vehicle has many similar things to another of the same type.

All vehicles can generally be taken out with a single infantry rocket, but Tanks and APCs take extra damage from the side and rear.
To minimize damage to those weak sides, armored vehicles can angle themselves against incoming attack to decrease damage.
The steeper the angle, the lower the damage (to a minimum of the indicated "ANGLE" number).

There are other multipliers in relation to vehicle weapons that alter the damage they do to one another.
A tank reads 1000 combined direct and blast damage, and while it will do that amount of damage to a HMMWV or a helicopter, the effect against other tanks is different.

There are several multipliers related to the impact and blast damage of the Tank Shell related specifically to the material of armored vehicles.
Instead of listing those, this is the easiest explanation = Tank Cannon damage against another Tank is approximately 350 to the front.


---


Vehicle Specializations are limited to the player who has them, and most will only work when the Pilot/Driver is the one who has it.
Armor will only improve a vehicle's defense when the driver has it.
Warhead and Reload will only improve the damage or reload time of the seat the player is in.
ALT V is only for the primary seat (and the attack helicopter gunner), no alternate weapon exists for secondary seats.
Smoke will only work for the pilot/driver.
While just about anything else on there should be simple enough, a slightly more detailed description of the Power Tool and the way it repairs:

The Power Tool fires at a rate of fire of 900 RPM. That's a "shot" every 0.066 seconds.
With each "shot", it gains 0.025 heat. Constantly fighting against that heat is a cooldown of 0.2.
The two combined with the rate of fire allows the Power Tool to fire 85 times over the course of 5.676 seconds.

It repairs 6.5 points of damage with each shot.
With the 0.3 second delay before the tool starts up, that's 559 vehicle health repaired over 6~ seconds.
Holding the trigger for 6 seconds will cause the tool to overheat.

Originally, it took two seconds to recover from full heat and the tool had a two second overheat.
As of R7, the 0.2 cooldown requires five seconds to cool down from full heat and Overheating also takes five seconds.

For reference, All armored ground vehicles have 1250 health.

Also, the Repair Tool delivers 19.5 damage against enemies and enemy vehicles per "shot".

---
A feature of HMG_Bullet (used by the M95) is that it can damage lightly armored vehicles such as Jeeps and Helicopters.

All bullets travel at the same arbitrary speed of "600" (though their tracers are made intentionally slower than the actual projectile).

---

Spotting
, like the repair tool, uses "overheat" to prevent excessive Socialize use.
The player is capable of about five Socialize button presses in rapid succession before overheating and being inoperable for five seconds.
With the cooldown, the fastest continuous rate that a player can spot without overheating is once every two seconds.
---
Each MCOM Station has 1000 health.

According to Materials, a C4 explosion has a 0.15x multiplier against the "Objective" material.
290 becomes 43.5. Twenty-three C4 stuck to the objective will destroy it.

Given the base damage of the rockets, all three match up with a 0.1x multiplier.
23 hits from the RPG-7, AT-4 and Tank Shells.
29 hits from the Carl Gustav.
32 direct hits from 40mm grenades to destroy the MCOM.

Call of Duty: World at War

Call of Duty: World at War info.
Der Riese Weapons Message Board Post

All numbers shown are from World at War\Main\iw_14.iwd and the Mod Tools and Raw Code provided by Treyarch.
These numbers are not from guess-testing. All data taken out of the game code of the PC version.
The only way any of this is incorrect is if I made a typo. I make changes and updates every now and then.

There are some differences on consoles compared to this information for PC.
I do not have the means to record these differences as I only have World at War for PC.
The only way to get accurate numbers for any differences is with help from others with those consoles.
Any differences found should be thoroughly tested using these PC numbers as a reference.
With conclusive results, any changes will be added to the Console Differences image.

-----

Server settings can allow player Health to be Miniscule (30) Half (50) Normal (100) and Double (200).
Health Regeneration can be set to Fast (2 seconds) Slow (10 seconds) Normal (5 seconds) and None (0 seconds).

Pretty much the only thing left is the Flamethrower. It isn't all that special.
On contact with the licks of flame, 50 damage per hit, 500~ range. It does not deliver damage over time (at all) like it does in Zombies.


Movement speed is based on which weapon class is in your primary weapon slot.
Carrying a machinegun as a primary will cause the pistol to also move at MG speed.

Pistol, SMG and Shotgun all have a speed of "1" or 100%. Rifles have 0.95 and Machineguns 0.875.
The menus in Create-a-Class are not congruent with some weapons' real "type".
For example the 30 Cal has "SMG" speed despite being a heavy machinegun.

Sprinting will increase movement speed to 150%.
Sighting a weapon will cut speed down to half, pistols cancel out that speed loss when sighted.
Moving sideways or backwards will also slow the player down to 80% or 70%.


The image should be able to explain itself.
Blast damage numbers are along the bottom, the Kill Radius and Max Radius are diagonal.
Direct Impact symbol is for Direct Impact damage.
Fuse is obviously the time for or how the explosive detonates.
Hold is the time it takes to "pull the pin" before throwing.
All explosives gradually lose damage from the center of the blast.

The Molotov behaves unusally.
If it hits the ground, it has a radius that will deliver the 150 Direct Impact damage, even if the enemy was not directly hit.
If it breaks against the wall or an object, no matter how close to the player it lands, it will deliver 90 splash damage.


All explosives have a unique damage multiplier against tanks.
The Tank's hit locations are Front, Side, Rear and Underside.
Multiply the Explosive's increased Damage by the Tank's Side Multiplier to get damage.

Only a Satchel Charge can properly hit the Underside and damage is increased dramatically.
The Satchel is the best explosive against the Tank and can destroy it with one charge.

Bullets do less than one point of damage, the Hit Indicator gives a sense of false security.
Do not waste your ammo (unless that ammo comes from the PTRS-41 or the tank's machineguns).

Projectile weapons - Bazooka, Tank Turret, Rifle Grenade - excel at removing the panels and destroying the Tank Treads. The sticky explosives have little effect against the treads.

The Armor Plating on the tanks absorb hull damage delivered by bullets or projectiles.
The plates are mere decoration against the N°71 and Satchel.
Unless every projectile is intercepted by an armor plate, the number needed to destroy the tank will not change.
The damage absorbed by the armor plates goes to knocking the armor plates off.


Time is the amount of time before the player can fire his weapon again.
The actual melee strike arrives in only a tenth of a second.
Melee is the normal swing/slash.
Charge is when the player locks on and moves to stab the enemy.
The Attached Bayonet has greater range at the cost of a longer recovery time.
Range is measured in "inches".


The further the enemy is, the less damage he will take. Weapons have different ranges at which damage drops.
For reference, the hull of both the T-34 and Panzer in WaW are about 250 inches in length.
Before you check Wikipedia, no, the tanks in game are not to-scale with the real-world versions.


AddTime is the point during reload when ammo is added to the ammo counter.
You can interrupt the reload after the AddTime and still have a loaded weapon.
"Empty" obviously refers to when the weapon magazine is out of ammo.


Fire Time is the time between shots fired. Dividing 60 by FireTime gets RPM; dividing 60 by RPM gets FireTime.
This determines the speed for automatic weapons and the time before taking the next shot for semi/bolt/pump weapons.
The Trench Gun and Bolt-Action Rifles use RechamberTime, same thing.


DAMAGE MULTIPLIER
Self-explanatory. Headshot equals more damage. For example, 30 would be increased to 42 with a 1.4 multiplier.
Sniper Rifles and a few other weapons have different multipliers, but they behave the same. Just multiply the damage by 1.5 or 1.4 or 1.1 or 2.


Idle Amount is the area in which the ironsights/scope on a weapon moves around, affecting accuracy.
Stances can improve the Idle Amount, but not all weapons benefit from lower stances.
Every weapon has perfect accuracy when aiming down the sights (shotguns the obvious exception).


View Kick controls the power, direction and maximum area at which the player's view will turn when firing a weapon.
The numbers are measured in degrees (10 = 1°). Bigger number, more kick.
Kick is random, but will focus on the average. The weapon will often kick in the direction of the higher number.
A direction with two numbers means that the weapon will ALWAYS kick in that direction.
The kick for Sniper Rifles are unnecessary since the weapons will recover before the next shot can be fired.


VIEWKICK CENTER SPEED (no image)
View Kick Center Speed affects how quickly the camera returns to where the player was aiming.
Center Speed is in effect from the very instant a shot is fired.
Higher number, faster recovery.


PC / CONSOLE DIFFERENCES

Without the console versions to check against, I am unable to discover the differences between platforms myself.
For PC, all of the information is correct. For consoles, any known differences are shown in the linked picture.
Credit to those who test and detail the differences for me to record them, most of them probably left a comment below and in the message boards.
So far, all tests have been done on the XBox 360. The state of the Playstation 3 version is unkown.

Yeah, it is actually called an N°74 ... but I like calling it the N°71.

Battlefield Heroes

Battlefield Heroes chart?

I wanted to have something that wasn't Call of Duty, something I could get the jump on.
(though "the jump" probably would have been when I got into the beta several months ago)
Since Heroes is free (not including buying fake clothes), anybody with a PC made after 200X can download and play.

NOTE: All numbers are direct from the game's files.
The only way any of these numbers are incorrect is if I made a typo or if the numbers have changed.

UPDATE: The "stylish" weapons are identical to the weapon that shares the same menu image.
For example, the Stylish Shotgun is the same as the Very Fast shotgun. No statistical advantages, only image.
MOST RECENT UPDATE: So far, every new weapon that has been added to the arsenal has been statistically similar to existing weapons.
For example the Bad Company 2 LMGs are identical to the Long Range MG
The BC2 SMGs to the Short&Fast SMG. The BC2 sniper rifles to the Slow&Heavy Rifle.
The Medal of Honor LMG to the Uber/Super Short&Fast MG. So on and so forth.
If the rate of fire and/or ammo capacity matches up, it is probably emulating that original weapon.

ANOTHER UPDATE: The new "Uber Super" weapons are, once again, identical to another existing weapon in almost every way. The differences are:

Ammo capacity for some weapons, that's obvious in-game, don't need to tell you that.

SMG Critical Chance has increased to 4%
Pistol Critical chance has increased to 13%
Shotgun Critical Chance has increased to 7%
MG Critical Chance has increased to 7%

Sniper Rifle Mid Range has become 20m and Long Range has become 30m.
Knife range has increased to approximately 1.5x the original's distance and delivers 30-37 damage.

Rocket Launcher has a 30% chance of dealing an extra 10 damage to enemies in the blast radius.
OH LOOK MORE UPDATES: Punk Heroes weapons are unique from all the Uber, BC2 and MOH weapons being mostly copies of existing guns.
Punk Heroes' SMG, Shotgun and Grenade Launcher added to the bottom of the image.


Every bullet is an object that travels, so shots have to be lead on distant targets.
Sniper Rifles have a high velocity, you barely need to lead at all with them.
Machineguns have about half or less the velocity of rifles.
Pistols and shotguns have one fourth the velocity of rifles.

---

Each gun type has three versions:
1) "Fast&Light" short range gun with a high fire rate and big spread
2) "Default" average gun that doesn't excel at anything
3) "Slow&Heavy" Long range gun with good accuracy and a slow... everything

The ideal equipment would usually be to pair a Short gun with a Long gun.
The guns need to be rented with Victory Points, earned by playing the game.
Though lots of guns are outclassed by others of its type.
For example, the Fast SMG pretty much dominates the SMG class.
The Default MG is superior in any range against the Fast MG.

-

For Damage, BFH uses a lot of numbers.
BFH guns have a min-max damage range for three seperate distances.

The damage for each shot is random, though the possible min-max for most of them are small enough that the number of shots needed to take out each enemy class will not vary that much.

There is also a chance for each weapon to score a Critical Hit for specific damage addition.

The rocket launcher is anti-vehicle, it has low blast damage. Its power lies in a direct hit.
Frags and TNT do a set amount of damage, damage decreases the further from the center of the blast.

The "range" areas are quite small.
Two values determine where Medium begins and where Long begins, Close starting at zero, of course.

-

Reloading consists of unimportant slapping and clacking for a few seconds.
The weapons in Battlefield Heroes are capable of being reloaded even when wielding another weapon during the reload.
Some call it "cold reload", I'm gonna go by its code, "Reload Without Player".

-

The Rate of Fire in BFH is set as rounds per minute.
No need to divide 60 by the time between shots.

-

Deviation (ie "spread") is presumably measured in degrees from the center of the crosshair.
While other Battlefield games make use of the many deviation variables, only a single number exists for Heroes.
A static number making a little cone of fire.

-

No weapon in Battlefield Heroes has Recoil except for the Sniper Rifle.
All three of them kick up and to the right.
The default rifle happens to kick the least.
The fast rifle has a bit more more oomph with each shot.
The long rifle will have you looking at the sky.

-----

No need to list the Abilities;
Their in-game descriptions tell you everything you'd need to know.

Actually, some of them could use some clarity.
For example, Frenzy Fire.
It only subtracts 0.1 Spread per level on the MG.
At level 5, any LMG only rivals the Fast SMG in accuracy.

Call of Duty Black Ops

Call of Duty: Black Ops Information
Data is 100% accurate based on data taken openly from the game's files.

Damage starts at one amount of damage, decreases over a certain range and continues at a lower damage.
Certain body parts multiply damage from attacks.
Note that the L96A1 has an extra damage modifier. The upper arm also takes 1.5x damage.
All shotguns' minimum damage is 10 and all five of them fire eight pellets of buckshot.
-
A weapon's Hip Spread is determined by a minimum and maximum cone of fire in degrees from the center of the screen.
Shotguns from the hip are much less accurate than they used to be before. Aim down the sights with them to make them a bit more effective.
-
Recoil is an area within four points and the random chance of the weapon kicking anywhere within that area.
The recoil causes the player's view to travel in that direction, a higher number means a faster camera jump and ultimately more recoil.
The kick focuses on the average between the points, so if a weapon kicks left 10 and right 60, the kick will almost always be to the right.
If a weapon kicks 60 both left and right, the sights have equal chance of jumping either way.
If both numbers are on one side of the arrows, then it'll always kick in that direction.
Working against the recoil is Center Speed (number in the bottom right of the Recoil box), a mostly arbitrary number.
Higher Center Speed means faster recovery as well as dampening the recoil, as CenterSpeed is always active from the instant you shoot.
No other attachment aside from obvious exceptions (Snub Nose) affect the recoil of a weapon.
The Red Dot and Reflex are completely benign and only serve as iron sight replacements.
-
A weapon's Fire Time is the time between each shot.
Divide 60 by the Fire Time and you get the Rounds Per Minute.
The L96A1 and Stakeout use RechamberTime, the same as FireTime, but there to prevent you from skipping the bolt/pump animation.
The burst fire weapons (M16, G11) have a 0.2 second delay between bursts, cutting their rate of fire down significantly.
Each weapon has a specific Reload Time for partial and Empty magazines.
For both of these reloads is the Add Time, the point where the Ammo Counter changes.
The Add Time indicates the point where you can cancel the reload animation and still have a reloaded weapon.
Some shotguns and the Python reload one round at a time. The first round takes longer than the following rounds.
The Python's Speed Loader time is also indicated in place of the Add Time (which is irrelevant for the Python).
-
Raise Time
 and Drop Time are the lengths it takes to put away one weapon and take out another.
Combine one gun's Drop with another's Raise to see how long it will take.
NOTE: Switching from one weapon to a Pistol will cause your weapon in hand to use Quick Drop, only 0.25 of a second.
Aim Down Sights takes a moment before the sighted accuracy takes effect after pressing the ADS button.
Depending on the weapon you're carrying, your character will have his running speed changed.
Like Call of Duty 1 and 2, it is no longer based on your primary; what is in your hand determines your speed.
Meaning if you switch to a pistol, you will run faster than whatever assault rifle or LMG you've got.
Oh yeah, and of course, players have 100 health by default. They recover all health immediately after five seconds of no damage.
And the Miniscule health setting of 30 is used for "Hardcore".
FLASH CHART - Be sure to update Flash.Click on the horizontal weapon image menu to select that weapon class.
Click on the weapon names on the left to select that weapon.
Click on the attachment image to modify the chart to reflect that attachment in green.
Hover the mouse over parts of the chart to see simple explanations.

Warlord will cause both attachment effects to take place. The only conflicts are with the Grip and Scopes which are specified.
Two of them embedded so you can compare two different guns side-by-side.
If there isn't a change indicated on the chart, it isn't changed statistically.
That includes attachments that have been omitted like the Red Dot.


Click here for the old not-Flash image.
The Flamethrower lets out an invisible projectile traveling along the flame stream that causes 50 points of damage.
Each projectile eats up 4% of fuel in the 100% tank, meaning 25 "shots" total.
The flame projectiles reach out to about 500 inches / 12.5 meters before fading out, giving it similar range to shotguns.
-----
Grenades and Explosive Equipment.
In the Blast Radius column are three numbers.
The Maximum Damage at the center of the blast.
The Minimum damage at the edge of the blast.
The Radius of the blast itself.
The Claymore has a specific cone for its blast. 60° in either direction from where you face it.
It's trigger area is near-identical to its blast radius.
Note that the Nova Gas delivers 13 damage every second to enemies while in its radius.
In the Time column, things get a little specific for each item.
Prep Time is the amount of time it takes to prepare and throw the grenade/equipment.
Prep Time is a combination of HoldFireTime (time to pull pin) and FireDelay (arm-throwing animation).
Fuse Time is obviously the amount of time it takes for the thing to detonate on its own.
Note that Concussion, Nova and WP won't explode until they land on the ground.
The Crossbow's fuse doesn't start until it hits an object.

Both Smoke grenades last for approximately eight seconds before they begin to clear up.
This means the Nova Gas is lethal if someone stays in the gas for the whole duration.
The Grenade Launcher and Crossbow have their own Reload times.
The Grenade Launcher needs to travel at least 9 meters to arm itself, otherwise it'll be a Dud.
Equipment and launchers take about a second to Raise after putting away their weapon.
Prepping C4 and Claymores is not unlike grenades.
The C4's trigger and Claymore's sensor Detonation both take approximately 0.83 seconds.
The Strela and LAW can destroy any enemy aircraft with one hit (not including Flares from helicopters).
The Ballistic Knife has exactly half the projectile speed of the Crossbow.
Both Knife and Crossbow have a very slight lift before they begin to fall on a flat shot.
The Ballistic Knife's melee time (0.6 & 1.0) is a bit faster than the normal melee (0.8 & 1.16) and does not need to wait for a gun's RaiseTime before attacking again.
Both knives' Melee Ranges (64) and Charge Ranges (128) are identical.
Whatever changes made to these ranges are so far only on consoles, but appear to be very minimal.

-----
Perks are rather straightforward this time.
With the exception of the specific numbers, the in-game description tells you just about everything in the briefest way possible.

Yeah, a patch is going to prevent / has prevented the Hardline Pro Gamble of anything except actual Care Packages.
-----
Killstreaks. The image is kind of crude right now, I'll touch it up some.
Because of the dynamics of each killstreak, things in the image are jumbled, but most things about the killstreaks are self-explanatory.
The way stuff is coded with multiple variables overwriting one another, finding the correct info is troublesome, there may still be some errors.
Some things:
The Spy Planes are only vulnerable to enemy damage for about twenty seconds.
Near the end of its time, enemies are unable to damage it with bullets (rockets still work). It flies off while still giving another pass or three to the team.
The SAM Turret and Sentry Gun have unlimited ammunition.
The SAM turret takes out Spy Planes in one hit, but will only take half of a helicopter's Max health in one hit.
In other words, the SAM Turret would need three missiles - one for the flare, two for the helicopter - to take a chopper out.
The Care Package drops have two columns of percentages (split in half).
The left are chances of each item to appear in the box and the right column is the Hardline Pro Gamble.
Both the Napalm Strike and Rolling Thunder dump fifteen bombs roughly along the area that their specific cursors indicate.
The Helicopters have an "armored" state that lowers bullet damage.
After 500 points of health (that's from the total health, not 1500 and 500 extra) are removed, they take full damage from bullets.
The time it takes for them to arrive and leave isn't counted in their sixty second timer. They'll be active and able to attack for about sixty seconds.

Modern Warfare 2

The handling of weapons has changed, they have been moved to one of the game's "fastfiles", encrypted.
Without that hard data, controlled testing is the alternative.

-----
This is the first presentable version of the "Interactive Modern Warfare 2 Chart".
Click on the top row of images to change to the list of that weapon class.
Click on the name of the weapon to change to that weapon.

Note: Shotguns replace "Empty" with "Next". The first reload time is followed by the "next" time for each shell added.

You need the most recent version of Adobe Flash Player to view the following.


I put up two of them so you can compare two weapons at the same time without having to switch between the two.

Damage is near 100% correct with data from the PC version's games_mp.log.
The range at which damage drops though is only approximate.
Player health is 100 and only 30 in "Hardcore".

Just like COD4 and WaW, body parts are segmented and multiply damage when hit.
"FireTime" is the split second between each shot.
"FireRate" is the potential amount of rounds the weapon can fire in a minute without reloading.

Hip Spread is measured in degrees from the center of the screen. (yet to get the shotgun spread)

"Reload" is the time from the very start to the very end of the reload (when the crosshair reappears).
"Empty" is the time to reload when the weapon is completely empty.
"Add Time" is the point in time in which the ammo is loaded, when the ammo counter changes.

"Drop Time" is the time it takes to put away a weapon to draw the other one.
"Raise Time" is the time it takes for that other weapon to be prepared to fire.
Combine the Drop of the weapon you switch from with the Raise of the weapon you switch to.
When switching to a Handgun, all weapons use QuickDropTime, only 0.25 seconds.
The M93 Raffica is also treated as a Handgun and benefits from QuickDrop as well.

"Sight Time" is the time it takes to Aim Down the Sight and return to the hip.

"Recoil" is measured with four opposing powers, two for up/down, two for left/right.
More power = more kick.
More power for one direction = more likely to kick in that direction.

On movement speed (player speed is determined by the weapon in his primary slot):
SMGs and Sniper Rifles have a Speed of 100%
Assault Rifles have a Speed of 95%
Machineguns have a Speed of 87.5%
Riot Shield has a Speed of 80%
A player can pick up another weapon and keep the movement speed of the weapon he spawned with.

-----

Details on things that are not guns, of what was able to be ripped out of the fastfiles (so far) thanks to gagarin.
Anything posted here is subject to scrutiny and change as we still go over it.

Sentry Gun has 1000 points of health and an extra 300 layer of health for bullets.
A Melee attack will instantly disable the Sentry.
The Sentry has the potential to fire continuously for eight seconds.
It recovers fully in four. If it "overheats", it will take eight seconds.
After 90 seconds, the sentry will destroy itself if the enemy has not done so.

The UAV and Counter UAV have 700 health and hang around for thirty seconds.

Both Helicopters have 1500 health, Chopper Gunner has one flare countermeasure.
The Pave Low has one flare and 3000 health.
Unlike the helicopter in COD4, these three will decrease bullet damage to 0.3x all the time.

The AI controlled Helicopters use three of the four same old Threat Factors.
Class Threat has been removed, presumably due to the Secondary Weapon diversity.
Both the Pavelow and Helicopter last for 60 seconds.
The player controlled Chopper Gunner lasts for 40 seconds, not including the time it takes to travel to the map.

Both the Precision Airstrike and Harrier Strike deliver the same payload.
Three (two for Harrier) jets fly by and drop a bomb that breaks apart and releases ten bomblets each.
Each cluster bomb has an explosive radius of 512 inches, with damage of 200 at the center to 50 at the edge.

The Harrier that hangs around has 3000 health and cuts player damage against it in half.
Luckily, some will instantly kill it (or at least really hurt it).
A Stinger, Javelin and other killstreaks (like the remote missile and AC130 guns) will instantly destroy it.
The RPG7 and AT4 will do a specific amount of damage - the Harrier's max health minus 900.
The Harrier will hover in place for 45 seconds.

The Stealth Bomber drops a lot of bombs.
Each of them have an explosive radius of 896 inches.
They deliver 300 damage at the impact point and 50 at the edge.

The AC-130 apparently only has 1000 health.
This is offset by two flare countermeasures and immunity to everything except Launchers.
It lasts 40 seconds. All three guns are available. They have a reload time of:
25mm = 1.5
40mm = 3.0
105mm = 5.0

The Care Package and Emergency Airdrop have a chance of dropping anything (except nukes).
Care Package has a much higher probability of dropping other low-Streak hardpoints, while the Emergency Airdrop evens up the chances a bit.
The Littlebird that drops the package has 500 health and can be destroyed.
Its speed is so great that the window of opportunity to destroy it before it drops the package is very small.

Claymores have:
0.75 second delay after detection. Scrambler Pro increases the delay to 3 seconds.
192 inch detection range.
70° forward field of view detection radius.

-----
On perks and a few other things:

The wait time between bursts for the FAMAS, M16 and M93R is 0.2 seconds.

Stopping Power is still a 1.4x damage multiplier against players.
Stopping Power Pro has that multiplier applied against vehicles. It may also ignore damage absorption some vehicles have.

Danger Close is a bit stronger than it's predecessor, 1.4x increase in explosive damage.
Danger Close Pro is the multiplier applied to all killstreak damage, from AC-130s to Sentry Guns.

Blast Shield equipment cuts damage down to 0.65x, ensuring high survivability, but not invincibility.
Blast Shield and Danger Close will cancel each other out.
Semtex stuck to the player is powerful enough to ignore Blast Shield.

Commando adds 176 units of measurement to the range of the 128 unit lock distance of the melee charge.
Commando Pro cuts off all damage for any fall.

Scavenger will replenish one of each kind of ammunition if that ammo is not already at "MaxAmmo".
One Primary weapon magazine.
One Secondary weapon magazine.
One Grenade/Equipment.
One Special Grenade.
One Underbarrel Grenade / Four Masterkey shells.

MaxAmmo is very particular regarding Scavenger.
MaxAmmo does not count the ammunition loaded in the weapon.
An assault rifle has a maximum of 180 MaxAmmo + 30 MagSize.
Launchers only have a MaxAmmo of 1. To pick up a second grenade, the launcher must be reloaded.
If the currently held weapon and grenades are full, a blue bag will not be picked up even if the other weapon is not full.

Rapid Fire attachment has the same effect as Double Tap, multiplying time between shots by 0.75x (other way around, Rate of fire by 1.33x)
FMJ (Full Metal Jacket) attachment has the same effect as Deep Impact, greatly improving penetration damage through walls and objects.

Painkiller divides incoming damage by 3.
Throwing knives and melee attacks will still kill a Painkiller in one hit.

One Man Army allows the player to change classes on the fly in 6 seconds.
One Many Army Pro cuts that down to 3. It takes the place of the secondary weapon.
Switching from a One Man Army class to a class that lacks it will still have kills account towards One Man Army challenges for the player's life.

Sleight of Hand cuts reload time in half.
Sleight of Hand Pro halves the time it takes to Aim Down the Sight, both sighting in and out.

Ninja Pro will multiply the user's footstep sound by an amount less than 0.25x.

SitRep will highlight any and all enemy Equipment with a bright red overlay from a very long distance.
SitRep Pro does several things:
Multiplies the volume of enemy footsteps by 4x.
Multiplies the volume of the player and his allies' footsteps by 0.25x.
This allows the one with SitRep Pro to more clearly make out the enemy footsteps.
SitRep Pro does not make the player's footsteps quieter to the enemy, only to himself.

Scrambler will begin to take effect at 800 inches from an enemy. Their radar will be completely snowed at 300 inches.
Scrambler Pro will delay claymore detonation for 3 seconds.

Steady Aim multiplies the hip spread of a weapon to 0.65x.
Steady Aim Pro adds five extra seconds to the 4.5 second breath hold time.

Lightweight will multiply the player's movement speed by 1.1x ( 8% to 10% increase depending on the weapon).
Lightweight Pro will cut the delay between sprinting and being able to fire in half.

Last Stand will leave the player at one point of health for ten seconds after taking lethal damage.

-----
The problem shotgun hitscans had with cars is dealt with, the one pellet's worth of damage dealt to destructible objects like barrels and cars are multiplied by four.
Cars and barrels have the same health and "on fire" health drain as they do in COD4.

Crysis 2

Most of the stuff in the game is rather complex and some things are spread in multiple places.

The Player has 120 Health.
After five seconds without taking damage, the player's health begins to regenerate.
 The Nanosuit has 100 Energy.
After one second of not using any energy draining functions, the suit will recharge 30 energy per second.
If the suit is reduced to 0 Energy, it stays disabled for three seconds before recharging.

Recoil for most weapons is low and character models are rather stiff and upright. There is not a lot of randomness when the weapon is sighted (much less with Aim Enhance), meaning accuracy and reflex are pivotal in a shootout. Aim for the head.
Weapons start off with a certain amount of Damage out to a set Distance.
After that range, the weapons in Crysis 2 lose Damage Per Meter to a Minimum Damage.
For example, the SCAR loses 0.25 damage per meter until it reaches 25 Damage.
The Single Fire mode on assault rifles has its own Damage, Range and Rate of fire.

Silencers typically have minor negative effects to go with the quietness and lack of showing a dot on the minimap.
The long range minimum damage is decreased slightly with a silencer equipped, just enough that it would take an extra body shot.
Note that the DSG-1 isn't showing a silencer - that's because it doesn't lose damage with it.
Weapons in Crysis 2 have their rates of fire measured in Rounds Per Minute.
Divide 60 by that RPM and you'll get the FireTime, or time between each shot fired.

The Rapid Fire Suit Module multiplies the rounds per minute uniquely for each weapon.
Weapons have a single Reload Time. Exception being the Marshall.
Along with the Reload time is the Fill Ammo Reload Fraction or "AddTime", the point when the ammo counter changes.
The Spread of a weapon has both a maximum and minimum, both reduced by a 0.8 multiplier when crouching.
The Point Fire Enhance Suit Module multiplies the hip spread of each weapon.
The Laser Sight Attachment reduces the hip spread of most weapons to around 3.0 and less when firing from the hip.

The functions of Recoil are mostly a mystery to me, but have some numbers anyway. Recoil is really low.
The recoil has a Maximum X and Maximum Y axis. Y for up and X for left-right.
Attack is probably the speed at which the the weapon/view is moved away from the point of aim.
Decay actively (and very rapidly) slows the Attack speed and returns to the center.
There is a small bit of Randomness to Attack that prevents the speed of the recoil from being 100% predictable.
Finally, the Aim Enhance Module multiplies the Decay of each weapon positively so that it recovers even faster.
The Mobility of a weapon is very simple.
The Base move speed multiplier of a player is that of the weapon in his hand and when not zoomed in.
When zooming in, the player's speed is decreased to the multiplier of whatever sight attachment he has on.
For example a player with a SCAR+Assault Scope will move at 98% speed and 50% when looking through the scope.
As for underbarrel attachments' negative effects to the Mobility stat in the weapon menu: no effect (unless that number is somewhere else).
When zooming in, the spread of most weapons is reduced to almost nothing.
Pistols have a bit of inaccuracy to prevent them from being just as useful at a distance, but everything else is reliably accurate out to very long ranges.
Note that the Microwave gun and both sniper rifles ignore the damage reduction of Armor Mode. Don't slow yourself down against foes wielding those.
The Hammer, Majestic and Grendel have a minor armor-piercing effect, causing Armor Mode to only reduce their damage to 80% (rather than 65%).


Power Jump gives the player 2.3x times the height of a normal jump.
It takes 20 energy to use.
The Air Stomp is a velocity-based attack. The higher you are, the more time you have to fall and the faster you'll go, naturally.
Depending on the height, the Air Stomp can deliver from a minimum of 40 damage to a maximum of 220 damage.
Similarly, the radius of the Stomp can grow from 2 meters out to 7 meters.
A simple Power Jump doesn't come close to getting enough air for more than the minimum damage. You need some elevation, a few seconds of air.

Speed (sprinting) will boost the player's forward speed to 1.8x.
Speed drains up to seven points of energy per second.
Stealth drains the player's Energy by five points when standing still.
Based on how fast the player is moving with stealth, the suit will drain up to fifteen points per second.
Stealth mode may also cause the player to take double damage while cloaked. Gotta look into this.
Armor drains 2 to 7 points of energy per second depending on the player's movement speed. His movement speed is also decreased to 80%.
Armor absorbs a percentage of damage to the Player's health. 35% of the damage is diverted to his Suit Energy.
If for example, a player with Armor is hit in the torso for 30 damage. His health takes 19 damage.
-----
SUIT MODULES
Armor:
Air Stomp - Velocity based attack, more speed = more damage. Requires elevation beyond a Power Jump.
Minimum Velocity Damage = 40 out to 2 meters
Maximum Velocity Damage = 220 damage out to 7 meters
UPGRADE II - No damage from falling
UPGRADE III - 0.5x recovery time after Stomp

Proximity Alarm - Sense enemy in 30m horizontal radius (not vertical), updates every two seconds
UPGRADE II - Sensor updates every second
UPGRADE III - Sensor updates every half-second

Armor Enhance 0.5x Energy Consumption
UPGRADE II - +25% movement speed in Armor Mode
UPGRADE III - Immune to Nanosuit Jammer Bonus

Threat Tracer Highlight Bullet path within 6m
UPGRADE II - Highlight Grenades within 15m radius
UPGRADE III - Highlights Explosives within 15m radius

Nano Recharge - 2x Health regeneration
UPGRADE II - 2x Suit Recharge (60 per second)
UPGRADE III - 0.5x delay before health regeneration

Detonation Delay +2 seconds to grenade fuse when in blast radius
UPGRADE II - +2 seconds to C4 fuse when in blast radius
UPGRADE III - Fires Chaff against enemy JAW missiles

Energy Transfer - Restores 20% energy with a kill
UPGRADE II - Restores 30% energy with a kill
UPGRADE III - Restores 50% energy with a kill

-

Stealth:

Stealth Enhance - Transition time to/from Stealth is halved
UPGRADE II - No shadow cast in Stealth mode
UPGRADE III - 0.5x energy drain rate in Stealth mode

Covert Ops - No Player footstep sound
UPGRADE II - Invisible to Ceph Airstrike
UPGRADE III - 2x Enemy footstep sound

Cloak Tracker - Creates particles on Cloaked enemy within 20m
UPGRADE II - Causes enemy Cloak to flicker after 7 seconds in radius
UPGRADE III - Causes enemy Cloak to flicker after 5 seconds in radius

Jammer - Scrambles the radar of enemies within a 10m range
UPGRADE II - Provides protection against enemy Radar Jammer attacks
UPGRADE III - Scrambles the radar of enemies within an 18m range

Blind Spot - Invisible to Maximum Radar
UPGRADE II - Immune to Visor Tagging
UPGRADE III - Become less visible to enemies in Nano Vision

Tracker - Tracks enemy footsteps within 25m, updates every 0.6 seconds
UPGRADE II - Footstep direction tracks
UPGRADE III - Doubled track updates, 0.3 seconds

Visor Enhance - Automatically Tag enemies when zoomed in
UPGRADE II - Enemy Flashbang grenade effect lasts 0.1x as long
UPGRADE III - Nano Vision energy drain 0.5x

-

Power:

Side Pack - +1 Primary magazine
UPGRADE II - +1 grenade/explosive
UPGRADE III - +1 Attachment ammo

Weapon Pro - 0.6x Reload Time
UPGRADE II - 0.5x Aim Down Sight time
UPGRADE III - 0.4x Weapon swap time

Aim Enhance - Reduced recoil (unique to weapon)
UPGRADE II - 0.4x view shake from explosions
UPGRADE III - 1.6x movement speed when aiming down sights (versus whatever negative speed it offers)

Loadout Pro - Two Primary weapons
UPGRADE II - No Mobility loss from Attachments
UPGRADE III - 1.5x speed while carrying HMG (Versus its 0.6x speed scale)

Rapid Fire - Higher rate of fire on Primary Weapons (unique to weapon)
UPGRADE II - Higher rate of fire on Secondary Weapons (unique to weapon)
UPGRADE III - Higher rate of fire on Mounted Weapons

Point Fire Enhance - Reduces spread of primary weapons (unique to weapon)
UPGRADE II - Reduces spread of Secondary weapons (unique to weapon)
UPGRADE III - Reduces spread of Mounted weapons

Mobility Enhance 0.5x Sprint and Jump Energy cost
UPGRADE II - 0.5x Ledge grab climb time
UPGRADE III - 0.25x Fire after Sprint time

Retriever - Automatically collect Dogtags
UPGRADE II - 1 less dogtag required for support bonuses
UPGRADE III - 1.2x Support Bonus time

Call of Duty 4

Call of Duty 4 Info.

If you're looking for the little images which used to be at the bottom here, I took them off to cut bandwidth usage.
You can get them in a .zip file from here:
http://www.megaupload.com/?d=XE0DI584
http://www.sendspace.com/file/4sre6g

NOTE: The recent 1.40 patch for the PS3 and 360 have altered the Firetime of the semi-automatic weapons.
Their rates of fire are, from different sources' testing, somewhere between 0.135 (444 RPM), similar to the semi-automatic rate of fire in COD2, and 0.105 (566 RPM).


I obtained the weapon information from the files of the PC version.
Specifically the iw_11.iwd archive in the /main folder.
I obtained all of the other information from the raw code and Mod Tools provided by Infinity Ward.
In-game testing going on absolute numbers - the only way any of this is not right is if I made a typo.
All of this applies to PC, 360 and PS3 versions.

I haven't used any other source but the game itself, in both reading the game code and testing it with help from others.
I change things regularaly (oops) in case of errors or new information, old charts may be circulating elsewhere.

I do not frequent and am not a member of any game or related messageboards or communities.
I do not advertise this thing; I showed a couple of people and they have passed it around.
I read feedback from forums and websites that link to these posts.
I do not play under the handle "DenKirson" in COD4, nor any other game.

-----

Every weapon is balanced to the point that you can use any weapon and it will be "the best".
Just because one gun does more damage or fires faster than another doesn't make it superior.
There are many more things than just damage or rate of fire that levels the playing field.
Each weapon has different handling that suits different players and play styles.
Use every gun - find the one that you like best and it will be your best.
Except shotguns. Those things suck; just use an SMG.

This balance only exists for Stock.
The weapons were designed and balanced for players with 100 points of health.
The decrease of health in Hardcore tips the scales in favor of a select few weapons. 30 health is too low for the "2345" damage design.
Many perks and weapons are made useless or redundant, removing them from their niche.
Weaknesses are removed and short range, low damage weapons are now super effective at long range.

-----
The little bars for the primary attributes are vague and in some cases, wrong.
The game doesn't refer to the actual weapon data to make the bars; the "attributes" are pre-set graphics in Create-a-Class.

Examples of wrong: M4 and G36c do the same damage. Uzi has a faster rate of fire and the same damage as the P90.

Example of vague: "Range" in the little bars refers to several things that are unrelated to one another.
Equipping an ACOG increases the Range bar while a Silencer decreases it.
A Silencer will shorten the damage range so it will become weaker more quickly.
The scope reads that it increases "range", yet it only increases zoom factor.

Also there is no such thing as a "range bug", the Skorpion and pistol bullets travel forever at their minimum damage just like every other weapon (except shotguns, by design).

---

Intended effects
-LMG Grips improve View Kick Center Speed (camera returning to where you were aiming) by a small but effective amount.
-Shotgun Grips decrease overall View Kick.
-ACOG scopes, when sighted, set ZoomFOV to 30, just over twice the magnification for the default 65° field of view.
ACOG also changes AimAssistRange (only applicable to console) to 2000, an improvement for all weapons except the sniper rifles.

Discrepancies
Some weapons have differences in themselves with some attachments, or are different from all other weapons.
These differences may be intentional or erroneous.

-M249 SAW with a Grip has improved Hip Accuracy (Between Assault and SMG hip accuracies)
-AK47's damage is 40-20 when equipped with a Silencer or Red Dot
-AK-74u when equipped with a Silencer or Red Dot has the hip accuracy of the assault rifles
-M40A3 with an ACOG does 75 damage (Paired with Stopping Power, EVERY body part is a one-hit kill)
-Remington 700, when sighted, has an ADSIdleAmount of 60 in which it moves around more compared to the other four sniper rifles (40)
-G3 with a Silencer has an erroneously long Melee Charge Delay, longer than the stabbing animation, so the lock-on melee attack does not work
-P90 and M21 have twice the SprintDuration, allowing them to cover twice the distance with their sprint. This was removed in console versions, but still exists for PC.

-----

There are twenty eight different materials with varying levels of protection. Most materials have the exact same amount of protection, so there are really only about six levels of protection ranging from next-to-none to impenetrable. For example, some brick walls cut damage down to around 20% for Medium/Large, so 40 damage would only be eight on the other side.

There are three levels of penetration applied to weapons: Small, Medium, Large. Statistically, there are next to no numerical differences between Medium and Large.
Small can only penetrate the weakest of materials without Deep Impact, and then can peck at enemies through brick and plaster with Deep Impact.

Because Medium and Large are nearly the same, there are virtually only two levels of Penetration (Small and Large).
Pistols, SMGs and Shotguns all have Small Penetration (except Desert Eagle and AK74U).
All LMGs, Sniper Rifles and Assault Rifles are Medium/Large.

Angle is the most affecting factor. Straight on, a wall may cut down 40 damage to 8.
At about a 20° angle, that 8 will be further cut down to 4, and at 45°, 1 damage.
More than 45°, the bullet will not penetrate.
Some wood and sheet metal can be penetrated at greater than 45° (they cut damage down to about 70%).

The depth of objects also plays a part. Corners can be penetrated at any angle with only a small loss in damage..

After passing through the material, the bullet will begin losing damage over distance all the way down to 1, this includes sniper rifles and LMGs.

DEEP IMPACT is powerful. The damage retained is nearly doubled (ie 8 damage becomes 16 damage), and the angle at which it can penetrate is almost 90°.
For the weak/thin materials like sheet metal, Deep Impact will increase its retained damage to 95% (ie 50 becomes 48).

---


Helicopters enter the map from one of several directions (most only have one or two) and travel between pre-determined points until it loops back to the beginning.
The time the helicopter is in play is dependant on the map and the situation. On average, it takes ten seconds for the chopper to arrive, sixty seconds of fighting, and another ten to exit if it hadn't been destroyed.

The helicopter absorbs bullet damage, dropping all damage to 30%.
After losing 500 points of its total 1100 health, the helicopter is "weakened" and bullets deliver full damage against it.
At the same time, the helicopter will engage "evasive Maneuvers" - travel from point to point more quickly and spend less time hovering in place.
After letting loose a burst from its vulcan minigun, it has about a two second "reload time".

Helicopters assess threat through four factors:
Distance from Helicopter - All players get threat based on distance from chopper. The max distance is pretty far.
Has attacked Helicopter - Anyone who has attacked the helicopter gets threat
Weapon Class - A player with a shotgun in their primary slot will not get threat.
Player Score - Highest scoring player in view gets most threat.
Whoever has the highest combined threat from these four factors will be the helicopter's Primary Target.
The helicopter will only target a player if it has seen more than 50% of his body.
If the helicopter sees you and you get behind cover, it may still attempt to shoot through the wall around where it last saw you.
Also, the KillCam shows a view above the helicopter, though this view is not congruent with the cannon on the bottom of the chopper; you may (or may not) see yourself in killcam, but the minigun sure saw you.

After extensive controlled testing and people letting themselves be killed by helicopters, the RPG-7 on your person does not affect threat, only the primary weapon does. This means that the Shotgun + RPG-7 pair is useful to avoid accumulating a tiny bit of threat so you can take the shot.

The RPG-7 is the only EFFECTIVE explosive against the helicopter because it only takes one soldier with an RPG-7 to take it down. That's effective. What isn't effective is the necessity of several soldiers carrying enough of the other explosives and the inaccessibility of the use of the explosives on the helicopter.

It would require several soldiers' stock of Frag grenades, Underbarrel grenades and C4.

"But it shows an X when I hit the chopper with it!"
Even if the helicopter is still absorbing bullet damage, the weakest SMG can do more damage in the amount of time it would take to throw one of those explosives at the helicopter. Stop wasting those explosives on the chopper. If you don't have a rocket, use bullets.

-----
Cars have a total of 1300 health, cut into multiple states.
The first totaling 550 health, the next of 750 health. Once the car takes 550 damage, it catches fire and loses its remaining 750 health rapidly, and will explode once its health runs out.
The splash damage of explosives are scaled up against cars so a single blast can detonate or set it on fire immediately.
Look out!

Melee Attack (slash) has a range of 64 inches and will make contact if the target is in a ten degree radius from the center of the screen.
Melee Charge (stab) reaches 128 inches of measurement and will auto-target anything in the center half of the screen.
In order to do a regular Attack, the enemy must be inside the 64 unit range, else the Charge will activate.


Because of the delay between bursts, the M16's rate of fire is effectively cut down to 450 Rounds Per Minute but the three rounds in themselves are fired at a speed of 925 RPM.

Moving sideways will only allow the player to move 0.8 times the total maximum (forward) speed.
Moving backwards will only allow the player to move 0.7 times the total maximum (forward) speed.
Sprinting will allow the player to move forwards 1.5 times the total maximum (forward) speed.

Carrying an SMG, Pistol, or Shotgun in your Primary Weapon Slot (that's the gun you're holding when you spawn) gives the player a "base" run speed of "1".
A Sniper Rifle or Assault Rifle in your Primary Weapon Slot has a base run speed of "0.95". Just 5% slower than the smaller guns, not really noticeable... but it could really make a difference.
A Light Machinegun in your Primary Weapon Slot has a base run speed of "0.875". 12.5% slower than the small weapons, a bit more noticeable.

Going by the two extremes, backpedalling with an LMG only has 41% the speed of Sprinting with an SMG.
This isn't CounterStrike, the gun in your hands does not decide your speed.
If you have an LMG and SMG, you run at LMG speed.
If you have an SMG and LMG, you run at SMG speed.

-

You need a reference for distance, look for the boxes.
The large cargo crates that you see a lot of in Shipment and WetWork are exactly 256x100 units in size.
256 being 6.5 meters, the same exact range of the Frag Grenade's max blast radius.


______________
Stock Player health is 100.

Hardcore changes:
-Health lowered to 30 (weapons are not changed in any way)
-No visible HUD

Old School changes several things:
-Health increased to 200
-Jump Height increased, landing slowdown disabled
-Weapon/Class Selection disabled, all spawn with a Skorpion and M9, must pick up weapons/perks that spawn on the map

"Health Regeneration" is really really simple.
After five seconds, all your health returns. Instantly. Completely.
Lose 1 health, wait five seconds. Back to 100%.
Lose 99 health, wait five seconds. Back to 100%.
You'll know you get your health back after five seconds by listening. Five seconds after taking damage, your character will exhale.

Every single weapon is pinpoint accurate when aiming down the sights, shotguns excluded. Pistols, sniper rifles. The dead center of the crosshair, the tip of the front sights, that is where the shot will land. Inaccuracy comes from the idling and kick.
If the guy is behind the sights, he will be hit.
If the shot misses, it is you who has missed.


The multiplications for Stopping Power, Double Tap, Sonic boom and Juggernaut are irrelevant. A simple explanation:
Juggernaut was designed so that you survive one more shot from almost any weapon.
Stopping Power was designed so that you would need to make one less hit with any firearm to score a kill.
The game code literally cancels out the damage effects when Stopping Power or Sonic Boom hits a Juggernaut. No increase, no decrease.
The damage perks are perfectly balanced against each other.
If you use "a whole magazine" to kill one guy, it isn't because of Juggernaut.YOU SUCK AT THE GAME.

Sonic Boom increases damage just enough for Hand Grenades to kill near the very edge of its blast radius.
Other explosive items' kill radiuses are nearly doubled, but the increased blast radius of any of them aren't nearly as large as the hand grenade.

Double Tap and Stopping Power are balanced in their improvement of power.
The two perks are perfectly even in their "Time to Kill a Guy" for weapons that deliver 30 damage.
Stopping Power gives a greater benefit of hundredths of a second in Time to Kill for weapons that deliver 40 damage.
Inversely, Double Tap gives a greater benefit of hundredths of a second in Time to Kill for weapons that deliver 20 damage.

Players in Last Stand have 1 OR 2 points of health. Their health purposely switches between one and two every half second in order to keep the red damage overlay visible.
Players in Last Stand are invulnerable during the transition to Last Stand mode, where they fall to the ground and draw a pistol.
Last Stand lasts exactly ten seconds after drawing the pistol.

Last Stand is not activated if the player is killed by: Headshot - Melee Attack - Explosive

---

Reloading in Call of Duty has a unique element. This has existed since Call of Duty 1.
A variable known as ReloadAddTime marks the point at which ammunition is added into the weapon during the Reload time.
Shorter than the full Reload time, a Reload Cancel after the Add time is up can stop the rest of the reload animation and have loaded the ammunition, effectively cutting off up to a full second for most weapons.

Not only does the add time apply to regular Reloading, but also to Empty Reloading, meaning that a Reload Add Cancel can eliminate the extra time needed to rechamber the empty weapon.

Reload Cancel is easy to do: just Sprint, Melee, or Switch Weapons while reloading.
Cancel after the ammo counter fills up = shortened reload.
It can be done with Sleight of Hand, but with the speed of the perk, Add Canceling will barely cut off any time than if it simply completed the reload animation.

There are three primary ways to cancel reloading and get the weapon ready whether or not it has loaded the ammunition:
-Melee Attack
-Switch Weapons
-Sprint

Melee has a long recovery (longer than what the Add Time would cut off) and should only be used to cancel if intending to attack.
Sprint and switching compete for speed. In the end, Sprint gives the shortest possible cancel time and allows the player full mobility instead of waiting for the weapon switch to be able to Sprint.

Reload Add Cancel is useful for just about every weapon.


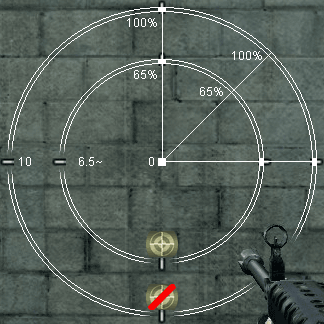
Hip Accuracy is simple enough. Draw a circle that touches all four crosshairs, and the bullet will land within that circle.
Steady Aim improves accuracy by shrinking the diameter and tightening the crosshairs to 65%.
The variable "perk_hipspreadmultiplier is 0.65.

Shotgun spread is not tightened when sighted with Steady Aim. They are still 5.5.
Steady Aim does not affect a weapon's idle, like sniper scopes, the M4, G36c, AK47, AK74u or ACOG.
Steady Aim ONLY AFFECTS HIP SPREAD. Only the crosshairs.

This image can also be used as an example as to just how wide a radius of ten degrees is in the game.
The SAW's maximum Hip Spread of "10" is exactly ten degrees in any direction from the center.


---

THE G36c IS SUPER DUPER, PRETTY SWELL, A REALLY COOL GUY, AND/OR AWESOME
There are four weapons in the Assault and SMG classes that "idle" WHEN SIGHTED:
The AK74u, the M4, the AK47 and the G36c
The middle two move from the center of the screen at the same speed and radius WHEN SIGHTED. The M4 is slightly faster in speed. The fourth is unique.
Not only does the G36c deviate far less WHEN SIGHTED, it moves slower AND stance improves its steadyness WHEN SIGHTED.

The numbers don't matter, I'm just using them to explain it.
The values involved are called ADSIdleAmount, ADSIdleSpeed and ADSIdle[Stance]Factor.
Compared to the M4:
M4 has a universal ADS Idle Speed of 1.5 and an Amount of 40 at all stances, all attachments included (ACOG too).
G36c has a speed of 0.8 and an Amount of 28 when Standing (ACOG too).
Crouching, the G36c's idle Amount is 21 and the speed is 0.6, at least half of the M4.
Prone, it'll barely move at a 11 Amount and 0.3 Speed, a fourth and a fifth of the M4's Amount and Speed.

The G36c is very steady when aiming down the sights compared to the other fully-automatic rifles.
More if crouched or prone.


Before anybody asks: No Sniper rifle or ACOG moves around less if crouched or prone.
The G36c (all attachments, ACOG included) is the only Primary Weapon (and ACOG) that benefits from different Idle Stance Factors.
The RPG-7 benefits from less idling with stances, but that doesn't improve the accuracy or random twisting and turning of the rocket.
The pistols Idle at nearly the same rate as the G36c and have slightly improved steadyness when crouched or prone.

The reason most other weapons don't idle is because if they did, they would suck.
The four ironsight weapons that idle do so because they would be utterly overpowered if they did not.
The M4 would outclass all other assault rifles if the ironsights were steady.
The MP5 would be obsolete in face of the AK74u.

-----

There are three sets of variables that determine Kick (for function, a fourth is just for show):
HipViewKick (not important, Hip Spread is going to be the factor that determines where the shots are going)
ADSViewKick
ADSGunKick


ViewKick has four variables each, two for left-right movement, two for up-down movement.
For the new viewkick column, the weapon will prefer to kick in the direction of the highest number.
Usually the two numbers are opposing forces, causing the weapon to kick in either direction.
When two numbers are going the same way, the weapon will always kick in that direction.

The ADSGunKick for most weapons is very low, and in for just about all of them, insignificant.

The variable ViewKickCenterSpeed is an arbitrary number that returns the camera to where you were aiming. Higher is better.

-----